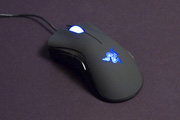
Lift off distance - At the current moment this is fixed for most users, however some mousepads still persist to have a fairly high lift-off distance. This is resolved using firmware 1.10 or higher (current is 1.21).
Negative/positive acceleration - This is completely resolved with firmware 1.10 or higher (current is 1.21).
Noisy scroll wheel - Some users complain that the scroll wheel "squeeks" when it's turned, this isn't a common problem however.
Mouse feet too thin - The DeathAdder's physical design causes the bottom of the mouse to scrape a little on the mouse pad (it's has a tiny curve underneath it causing this). This scraping can be resolved using extra mice feet or thick mice feet.
DeathAdder light is broken - Some DeathAdders are malfunctioning with the light, currently this is only a few cases.
I realised that not all people want to read an extensive guide but just want to get the mouse working in a hurry, for those of you I have added this section. To get the DeathAdder up and running quickly do the following
1. Install the driver
2. Flash the firmware to 1.10 (follow the firmwar update guide in this guide)
3. Set the wanted razer sensitivity
4. Bind the buttons (actually just leave them at default if nothing special is needed besides clicking the buttons)
5. Uninstall the driver
6. Stick some teflon tape / extra feet underneath it to increase the distance to the pad
This will render you a mouse with 1-6mm lift off depending on the pad, no acceleration and max speed of almost 3,92 m/s.
To begin with fresh from start
1. Plug in the DeathAdder (MAKE SURE YOU USE AN USB PORT DIRECTLY ATTACHED TO THE MAINBOARD) We have seen not so good incidences where people have plugged it into USB hubs, USB hubs on monitors etc., it's not recommended!
2. Insert the Driver CD that came along with the DeathAdder and install the drivers from it
3. Make sure you have installed the following
- Razer Driver 1.05
4. Unzip the package with the DeathAdder 1.21 firmware (available at http://www.razersupport.com/index.php?_m=down...&nav=0)
5. Go to the directory where you unzipped the firmware package
6. Double click the DAFirmwareUpdater.exe
7. The windows installer will tell you it found new hardware
8. Select "No, not this time" (press T on the keyboard if you don't have a spare mouse plugged in)
9. Select "Next" (press alt+N on the keyboard if you don't have a spare mouse plugged in)
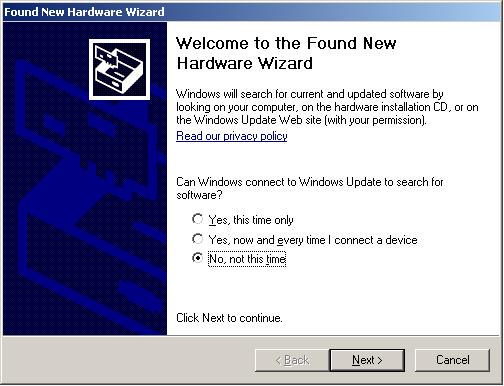
10. The windows installer will ask you to install the Cypress Generic USB Device (this is required to flash the firmware)
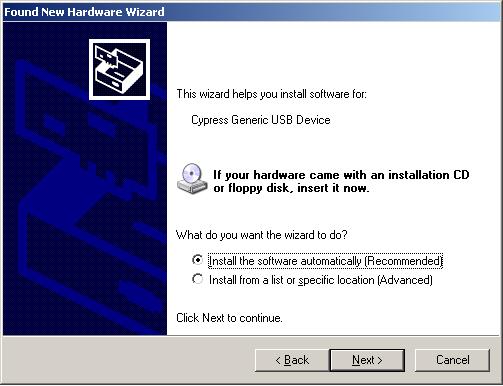
One of two scenarios can now occur, either you have the driver CD (11A. and forth) or you don't (11B. and forth).
You have inserted the driver CD
11A. Select "install the software automatically" (press I on the keyboard)
12A. You will be asked to install the Cypress Generic USB Device even though it's not approved by windows compatibility, it's OK press alt+C to continue.
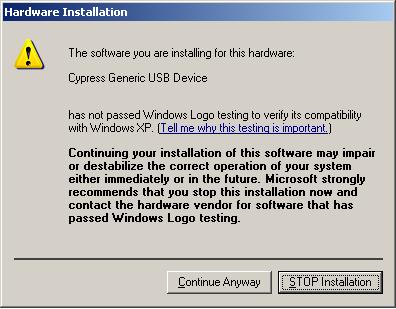
13A. Select "install the software automatically" (press I on the keyboard)
14A. Press Next (alt+N)
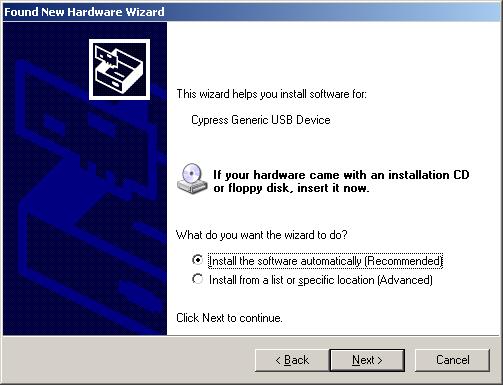
15A. Once the software is installed the firmware will be flashed.
NOTE: If the firmware fails the first attempt just double click the DAFirmwareInstaller.exe again and it should go smoothly.
You don't have the driver CD
11B. Select "install from a specific location" (press S on the keyboard)
12B. Point the windows installer to the driver directory location where you unzipped the firmware package (eg. C:Documents and Settings%USER NAME%DesktopFirmware_1.21Driver
13B. You will be asked to install the Cypress Generic USB Device even though it's not approved by windows compatibility, it's OK press alt+C to continue.
14B. Select "install from a specific location" (press S on the keyboard)
15B. Point the windows installer to the driver directory location where you unzipped the firmware package (eg. C:Documents and Settings%USER NAME%DesktopFirmware_1.10Driver
16B. Press Next (alt+N)
17B. Once the software is installed the firmware will be flashed.
NOTE: If the firmware fails the first attempt just double click the DAFirmwareInstaller.exe again and it should go smoothly.
1. Plug in the DeathAdder (MAKE SURE YOU USE AN USB PORT DIRECTLY ATTACHED TO THE MAINBOARD) We have seen not so good incidences where people have plugged it into USB hubs, USB hubs on monitors etc., it's not recommended!
2. Insert the Driver CD that came along with the DeathAdder and install the drivers from it
3. Make sure you have installed the following
- Razer Driver 1.05
4. Unzip the package with the DeathAdder 1.21 firmware (available at http://www.razersupport.com/index.php?_m=down...&nav=0)
5. Go to the directory where you unzipped the firmware package
6. Double click the DAFirmwareUpdater.exe
7. The windows installer will tell you it found new hardware
8. Select "No, not this time" (press T on the keyboard if you don't have a spare mouse plugged in)
9. Select "Next" (press alt+N on the keyboard if you don't have a spare mouse plugged in)

10. The windows installer will ask you to install the Cypress Generic USB Device (this is required to flash the firmware)

One of two scenarios can now occur, either you have the driver CD (11A. and forth) or you don't (11B. and forth).
You have inserted the driver CD
11A. Select "install the software automatically" (press I on the keyboard)
12A. You will be asked to install the Cypress Generic USB Device even though it's not approved by windows compatibility, it's OK press alt+C to continue.

13A. Select "install the software automatically" (press I on the keyboard)
14A. Press Next (alt+N)

15A. Once the software is installed the firmware will be flashed.
NOTE: If the firmware fails the first attempt just double click the DAFirmwareInstaller.exe again and it should go smoothly.
You don't have the driver CD
11B. Select "install from a specific location" (press S on the keyboard)
12B. Point the windows installer to the driver directory location where you unzipped the firmware package (eg. C:Documents and Settings%USER NAME%DesktopFirmware_1.21Driver
13B. You will be asked to install the Cypress Generic USB Device even though it's not approved by windows compatibility, it's OK press alt+C to continue.
14B. Select "install from a specific location" (press S on the keyboard)
15B. Point the windows installer to the driver directory location where you unzipped the firmware package (eg. C:Documents and Settings%USER NAME%DesktopFirmware_1.10Driver
16B. Press Next (alt+N)
17B. Once the software is installed the firmware will be flashed.
NOTE: If the firmware fails the first attempt just double click the DAFirmwareInstaller.exe again and it should go smoothly.
To use the DeathAdder drivers in Vista (32bit) do the following right click on setup.exe
1. Enable WinXP SP2 Compatibility on the setup.exe file in the directory where you unzipped the razer driver install package.
2. Run as administrator
64Bit drivers aren't available for the DeathAdder yet, Razer has them in the works but they haven't been released yet.
1. Enable WinXP SP2 Compatibility on the setup.exe file in the directory where you unzipped the razer driver install package.
2. Run as administrator
64Bit drivers aren't available for the DeathAdder yet, Razer has them in the works but they haven't been released yet.
First of all, start a game that uses DIRECT INPUT this is VERY important as a non DirectInput game is directly affected by the windows desktop and the mouse DPI. This means that if you run a screen resolution smaller than the DPI of the mouse, you will get results of FALSE negative acceleration. This happens because of the way the windows mouse input works, when you hit the boundary of the screen (which you will very fast using 1800 dpi on a 1024 or even small resolution) the mouse will reset to the centre of the windows desktop, which gives a false result of negative acceleration.
Following games that i know of uses DirectInput
Quake III Arena: Use "+set in_mouse 1" in the command line / console
Quakeworld: Use "-dinput" in the commandline (only commandline enablable)
I know that BF2 doesn't use Direct Input so avoid using that game (correct me if im wrong). You can also get the MouseForce (I think it's called) and force direct input upon games.
The test
1) Start some game you play, preferably FPS (WITH DirectInput Enabled).
2) Set a low sensitivity (lower than your normal sensitivity).
3) Aim your crosshair at a specific point like a corner or something that's easily recognizable.
4) Slowly move your mouse all the way across your mouse pad to the edge.
5) Move the mouse *fast* (as fast as you can) back to the starting point.
Now one of three situations have occurred:
1) The crosshair has overshot the point you picked out. This is positive acceleration
2) The crosshair has undershot the point you picked out. This is negative acceleration.
3) The crosshair lands spot on (with human error in mind). No acceleration is present.
As easy as this, and repeat the test 3-5 times to make sure it's a positive result.
Oh and the final thing, if the crosshairs suddenly stops moving like in a choppy movement and SERIOUSLY undershoots the spot, were talking about skipping (this should happen though, as speed tests show max speeds of 2.5 m/s (450 DPI) - 4.5 m/s (1800 DPI) which you will hardly ever reach using normal movements)
Currently the following pads are confirm to have the lift off distances listed below (measued in the heights of CD/DVDs = 1.2mm per CD/DVD)
Wooden table top (yellowish wood): 1.2 mm
fUnc Surface 1030, blue, smooth side: 1.2 mm
Icemat 2nd Edition, black: 1.2 mm
MTW: 1.2 mm
fUnc Surface 1030, blue, rough side: 1.4 mm
Allsop raindrop, black/grey: 2.4 mm
Generic red mousepad: 2.4 mm
Generic green mousepad: 3.6 mm
QcK+, black: 3.6 mm
Steelpad 5l, tested on most of the colours: 3.6 mm
Razer Mantis Control: 4mm
Razer Mantis Speed: 6 mm
All the following solutions adds enough distance to make the DeathAdders bottom go free of the mousepad.
Solution for the lazy
Order some aimtape from http://aimtape.com/en-welcome.asp or anything similar to this, perhaps you can even get teflon tape at your local hardware store i found that pure ice / standard resembles standard teflon feet the closest in terms of friction, but i guess this is individual.
Cut of two pieces per feet, stick them on top of each other and stick this on top of each of the DeathAdders feet. Looks bad, but works.
Solution for the homefixer
Either go buy some aimtape (I had some lying around) or buy some standard ducttape - In fact anything that can add a little distance AND sticks well to plastic. Gently take of the feet of the DeathAdder and make sure you don't damage them by curling them up or something like that. Stick the original feet on top of the ducttape/aimtape/etc. and cut with a scissor around the shape of the feet. Make a double layer like above and stick the feet right back on.
Solution for the moneyspender
Go buy Hyperglides, Pro dots, what-ever dots and stick them on top of the original feet. However the feet has to be 2-3 times the normal thickness of other mousefeet, since the DeathAdder has a slightly curved bottom.
Update from RazerCorp
I e-mailed Razerguy about this problem and he says there will be extra mice feet available from EverGlide within a month.
NOTE THAT THE FOLLOWING WILL RENDER YOUR GUARANTEE INVALID AS YOU OPEN THE MOUSE
To begin with here what you need
1 - A Screw driver, cross(star) shaped like the ones for normal computer screws.
2 - A Can of WD40 (http://www.wd40.com) or just some WD40
Before you start you may ask: Is WD40 Safe for my mouse, here is what the homepage says (http://www.wd40.com/Brands/wd40_faqs.html)
What surfaces or materials are OK to use WD-40 on?
WD-40 can be used on just about everything. It is safe for metal, rubber, wood and plastic. WD-40 can be applied to painted metal surfaces without harming the paint. Polycarbonate and clear polystyrene plastic are among the few surfaces on which to avoid using a petroleum-based product like WD-40.[/quote]
Here is what to do (MAKE SURE YOU DO THIS WHILE THE MOUSE IS UNPLUGGED)
1. Locate the screw on the belly of the DeathAdder
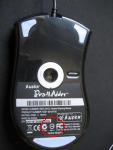
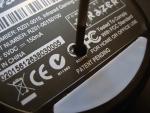
2. Unscrew it
3. Open the hull
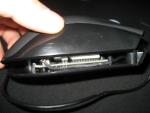
4. Locate the part with the scrollwheel (the one on the right)
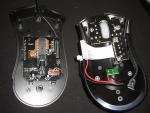
5. Lubricate a piece of cloth, kitchen roll, cotton piece or similar with WD40 (don't soak it)
6. Gently remove the wheel from the holder and lubricate the area marked with a red circle (the pin that's inserted into the place holder)
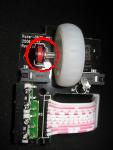
7. Assemble the DeathAdder again.
This should fix the squeaky sounds from the wheel some people are complaining about.
Pictures are courtesy of razerblueprints.net gallery, I edited them for the sake of this tutorial, if the owner does not want them here contact me and I'll have them removed.
To begin with here what you need
1 - A Screw driver, cross(star) shaped like the ones for normal computer screws.
2 - A Can of WD40 (http://www.wd40.com) or just some WD40
Before you start you may ask: Is WD40 Safe for my mouse, here is what the homepage says (http://www.wd40.com/Brands/wd40_faqs.html)
What surfaces or materials are OK to use WD-40 on?
WD-40 can be used on just about everything. It is safe for metal, rubber, wood and plastic. WD-40 can be applied to painted metal surfaces without harming the paint. Polycarbonate and clear polystyrene plastic are among the few surfaces on which to avoid using a petroleum-based product like WD-40.[/quote]
Here is what to do (MAKE SURE YOU DO THIS WHILE THE MOUSE IS UNPLUGGED)
1. Locate the screw on the belly of the DeathAdder

2. Unscrew it

3. Open the hull

4. Locate the part with the scrollwheel (the one on the right)

5. Lubricate a piece of cloth, kitchen roll, cotton piece or similar with WD40 (don't soak it)
6. Gently remove the wheel from the holder and lubricate the area marked with a red circle (the pin that's inserted into the place holder)

7. Assemble the DeathAdder again.
This should fix the squeaky sounds from the wheel some people are complaining about.
Pictures are courtesy of razerblueprints.net gallery, I edited them for the sake of this tutorial, if the owner does not want them here contact me and I'll have them removed.
As of Driver version 1.05 the middle button issues with other buttons causing irregular behaviour have been resolved. Download the latest driver here
http://www.razersupport.com/index.php?_m=down...ditemid=70
http://www.razersupport.com/index.php?_m=down...ditemid=70
Some slower CPUs can have a hard time with the button presses of the DeathAdder and thus there can be a small delay from when you press the button to the actual action occurs. The Razer driver has three processes running
Razerhid.exe - This is the actual driver (the one to set to high)
Razerofa.exe - This is the on-the-fly-sensitivity manager
Razertra.exe - This is just the windows tray object
To solve this do the following
1. On the windows desktop: Press ctrl + alt + del
2. Go to the pane "processes"
3. Locate "razerhid.exe"
4. Right click and select "Set priority" and choose "High" or "Realtime" (Note that if you have a slow CPU realtime is NOT advised)
But what if I want this to happen every time i start windows?
You can have windows do this on the startup of the system
First we do this to remove any current autostart entries from the DeathAdder drivers
1. Go to Start > Run > msconfig and press Enter
2. Go to the pane "Startup" and uncheck any instances of "razerhid.exe"
* MAKE SURE YOU ONLY UNCHECK RAZERHID.EXE ENTRIES, OTHERWISE YOU MAY *censored* UP VITAL PROCESSES TO OTHER PROGRAMS
Next step is
1. Go to the directory C:Documents and Settings%USERNAME%Start MenuProgramsStartup
%USERNAME% = The current windows users name (eg. C:Documents and SettingsJohn DoeStart MenuProgramsStartup) if the users name is "John Doe"
2. Create a .bat extension file (you can make a new .txt file and rename the extension to .bat)
3. Type in the following
start "Razer Driver" /high /b "c:Program FilesRazerDeathAdderrazerhid.exe"
In this case we start it with high prority (/high) other options are /low, /normal, /above normal and /realtime
/b makes sure we dont create cmd.exe popups
The directory in the "" is where you installed the DeathAdder drivers
4. Save the file
Now your DeathAdder will run at windows startup with high priority (or which ever priority you assigned)
This is a hardware malfuction, you should contact Razerzone.com and issue a RMA, or the retailer where you bought the mouse and have them issue an RMA to have the mouse replaced.
This question has been asked to me a few times, so i decided to make a comparison. Because the DeathAdder is really a lot more expensive than the MSIE 3.0.
The comparison
The DeathAdder can natively perform a perfect control speed of 3,92 m/s which is far beyond any speed you will ever hit during game play, while the MSIE 3.0 has a native speed of 1,00 m/s which is easily hit by most players with low sensitivity.
If we tweak the MSIE 3.0 to a 1000Hz using an USB Hack, we can get it to perform a perfect control speed of 1,55 m/s, which by far is enough for most players, unless you play with REALLY low sensitivity.
So if we compare a tweaked MSIE 3.0 to a DeathAdder they perform equally good for the kind of sensitivity most people use, so here it's basically a question of which visual design you like the best and what money you want to spend on the mouse.
But if you play at official competitions like the CPL you will not be allowed to apply a USB Hack to tweak the mouse, so here we have to look at the native performance of the two mice, where the DeathAdder truly outperforms the MSIE 3.0. So if you're going to play official tournaments, I'd definitely go for a DeathAdder.
Edited by Nicky at 15:56 CDT, 12 March 2008 - 550026 Hits

